


An alternative to the usual cinnamon bun
Don’t get me wrong. I do like a good cinnamon bun but when I saw this recipe, I knew I had to try it. I love the taste of cardamom in baking. I didn’t grow up in a household that used this spice in baking so for me, it’s unique and interesting.
These buns are not as sweet as North American cinnamon buns and do not have cream cheese icing. They are a delicious bun to have with a nice cup of tea in the afternoon.
I found this recipe on www.lovefood.com and it is called Swedish Cinnamon buns. It states on the website that the recipe is originally from Soulful Baker by Julie Jones, published by Jacqui Small. A little more searching with my friend Google, and Soulful Baker is a cookbook! I’ve added it to my list of “wants” for my next cookbook.
I’ve decided to call them Swedish Cardamom Buns since I’ve increased the amount of cardamom spice used and to differentiate this recipe from my usual cinnamon bun recipes.
I’ve made Swedish Cardamom Buns a few times now and I have figured out the best way that works for me using my Ankarsrum Mixer. I do recommend you try this recipe. It’s amazing!
Looking for another sweet dough bun that tastes amazing? Try these Orange Bowknots! They have a wonderful orange flavour that will keep everyone happy.

Tips and Tricks
- Please use a scale. I find my baking is so much better when I weigh out my ingredients.
- As with making bread, rising times are only an estimate since everyone’s house is different. A warm location is best for this process.
- Take your egg and butter out of the fridge a few hours before you plan on baking to allow both to come to room temperature. It will make incorporating the ingredients so much easier.
- The original recipe states you can use a baking tray instead of muffin tins but I have never tried this and I’m not sure about the “spreading” of the buns if you don’t have them confined in a muffin tin.
- For my Canadian readers, Castor Sugar is called “Super Fine Sugar” and is available in the baking aisle in most larger grocery stores. I have not tried this recipe with regular granulated sugar as I tend to keep castor sugar in the house.
Disclosure: I may receive compensation if you purchase any item through the link provided at no additional cost to you. I only recommend products or services that I have either used myself or would purchase for myself, my family or friends. I appreciate your support.
Swedish Cardamom Buns
Ingredients
Step 1
- 250 ml Whole Milk
- 100 grams Unsalted butter
Step 2
- 7 grams Active dry yeast
Step 3
- 1 Egg – room temperature
- 50 grams Caster sugar
- 500 grams Bread Flour
- 1 Tsp Kosher Salt
- Oil, such as grape seed, to coat bowl
For the Filling
- 75 grams Unsalted butter – room temperature
- 30 grams Caster Sugar
- 2 Tsp Cinnamon
- 1 1/2 Tsp Cardamom
For the Glaze
- 1 Egg Yolk
- 2 Tbsp Milk
- Turbinado Sugar to sprinkle on top
Instructions
Step 1
- Warm the milk and butter to 105 – 110° F. The butter should be mostly melted.
Step 2
- Transfer your milk and butter mixture to the bowl of your stand mixer.
- Making sure your milk and butter mixture is luke warm, add your yeast. Allow the yeast to proof until bubbly and frothy – approx. 10 minutes.
Step 3
- Turn your mixer on low speed and add the egg. Slowly add the sugar, flour and salt.
- Continuing kneading with your mixer until the dough is soft and not sticking to the sides of the bowl. For my mixer, this took about 8 minutes.
- Use a bowl that will be big enough for your dough to double in size. Apply a light coating of oil to this bowl and transfer your dough to it. Cover the bowl with plastic wrap and place in a warm area to rise. This can take anywhere from 1 hour to 2 hours depending on the temperature of your house. Check your dough after an hour.
Filling
- While your dough is rising, make the filling.
- Put all the ingredients into a bowl and mix it throughly. I used a fork initially and found it worked very well.
After the dough has doubled in size
- Place the dough onto a lightly floured surface.
- Roll the dough into a rectangle that is 18 x 14 inches with the long side of the rectangle towards you (see pictures for details).
- Spread the filling over the bottom half of the dough.
- Fold the top half of the dough over the bottom half that has the filling on it. press down on the edges to seal in the filling or it may squish out at you during the next step.
- Being gentle, roll the dough back out to the original 18 x 14 inches size.
To make the actual buns
- I use a pizza wheel cutter to cut strips that are 1 inch wide. You should get 18 strips.
- Take 1 strip and holding each end, twist it several times. Then take the twisted strip and tie into a loose knot. Tuck the ends in so they aren't sticking out. Repeat with each strip.
- Place the buns into the muffin trays. Loosely cover each tray with plastic wrap and allow to rise again in a warm place until about double in size. This may take 60 minutes but check them after 45 minutes.
The final steps – you are almost there
- After the dough has been rising for 30 minutes, preheat your oven to 400°F.
- Make the glaze by combining the egg yolk with the milk.
- Once the dough has rising, gently brush each bun with the glaze mixture. Sprinkle a little bit of sugar on each bun.
- Bake for 10 to 12 minutes turning half way through your baking time. Bake until the buns are golden brown in colour and cooked through. For me, 10 minutes is enough time but your oven may vary.
- Allow to rest in the muffin tins for about 5 minutes then transfer to wire racks to cool completely before enjoying. Don't let them cool completely in the tins or your may find they stick as the sugar comes to room temperature.
Pictures of the process to help you out
The first time I make a new recipe, I love to have pictures to follow along to see if my baking is going well.


Have your butter at room temperature so that you don’t need to heat your milk too high. If you do end up with very hot milk, it’s okay. You just need to let it cool down before you add your yeast. If the milk is too hot, your yeast will die and you will need to start over.
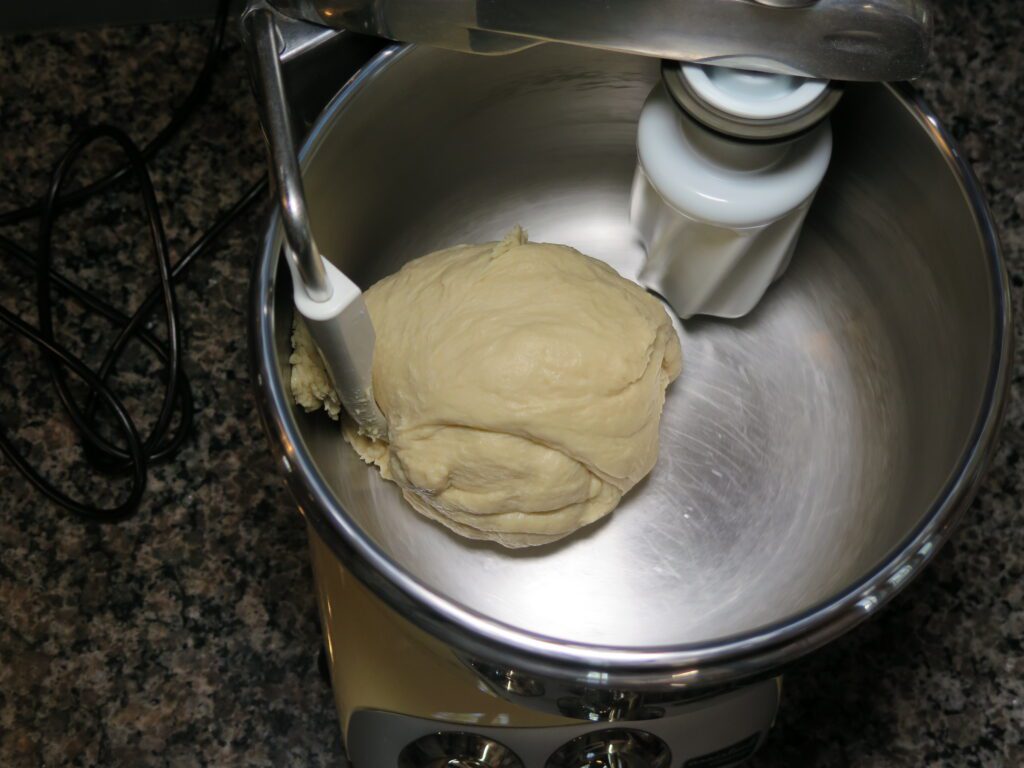

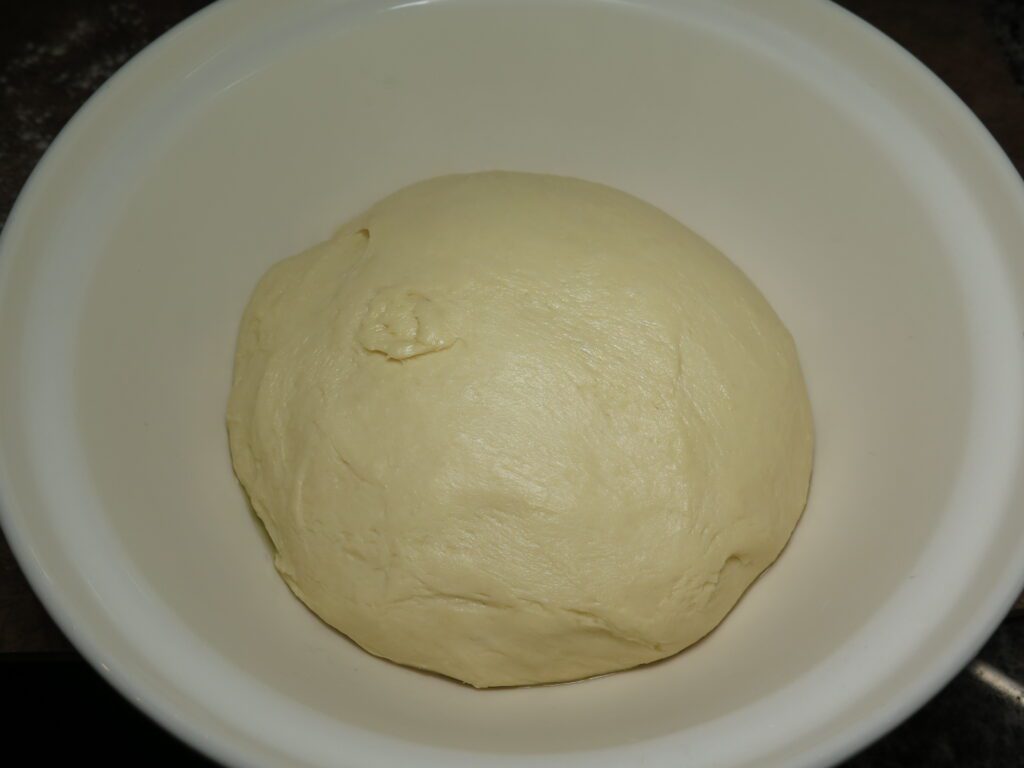
While the mixer is running, add your dry ingredients and continue to knead until you get a soft, smooth dough that doesn’t stick to the sides. With my Ankarsrum mixer, it took about 8 minutes. Lightly oil a bowl and transfer the dough ball to it. Cover with plastic wrap and place in a warm spot to double in size. This took me about 1 1/2 hours. In the winter in Canada, I will also wrap the bowl with a wool blanket to help.

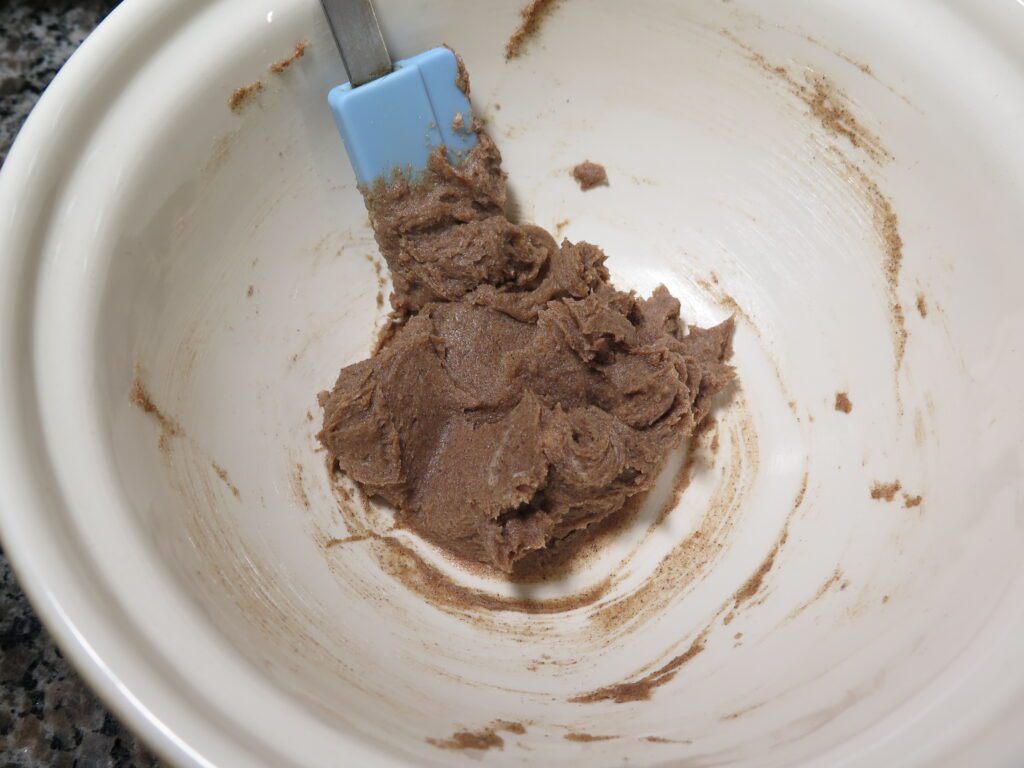
You can mix your filling while the dough is rising. I used a fork initially to mash everything then I found a scraper worked well for the finally incorporation.
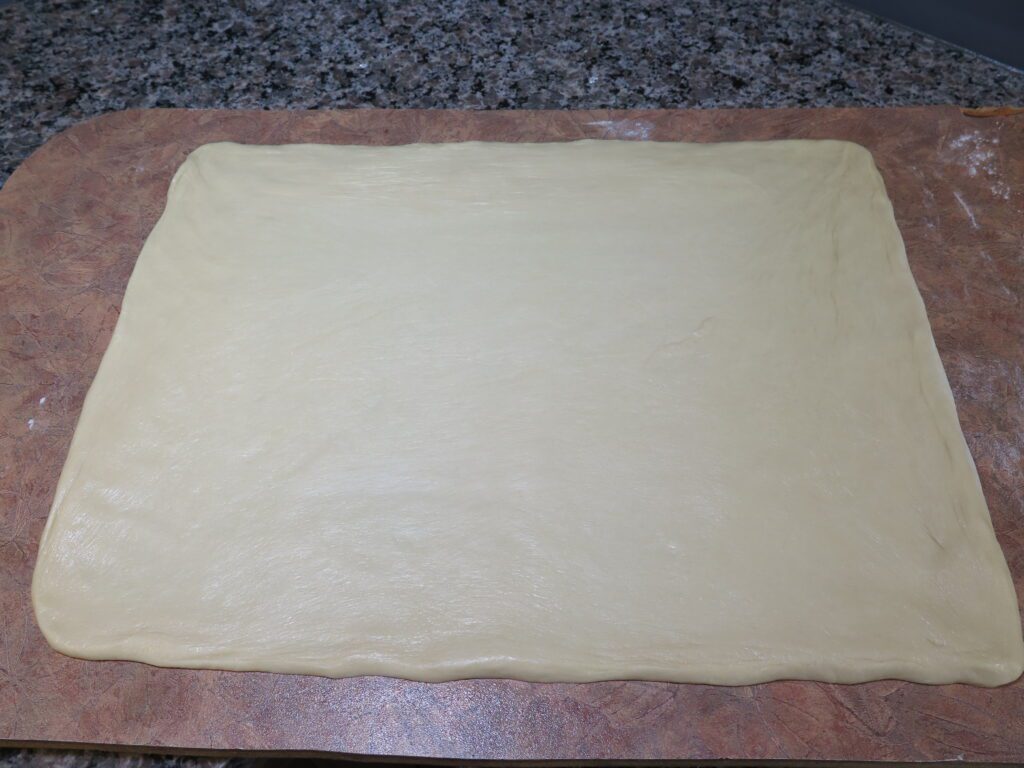
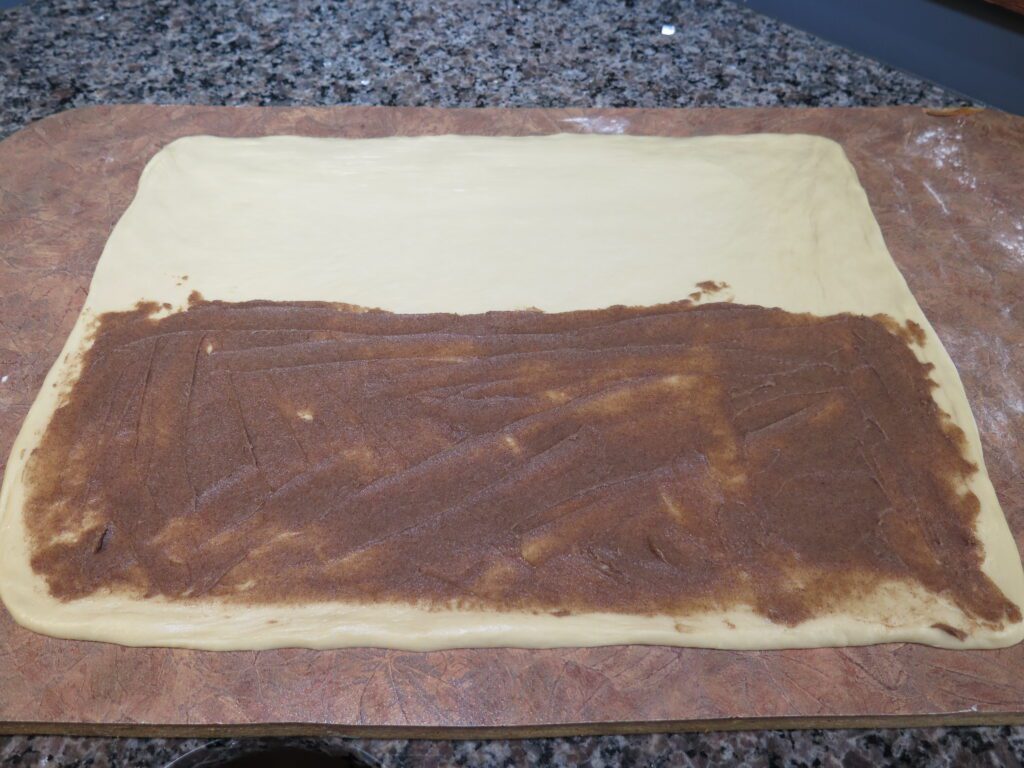
Lightly flour a clean surface and roll the beautiful dough into an 18 x 14-inch rectangle. The long side should be closest to you. Spread the filling mixture onto the bottom half of your rectangle. This is where keeping your butter at a very soft consistency helps immensely! .


Fold the top half of the dough over the filling half and press down on the edges. You want to seal the edges so that when you roll the dough out again you don’t squish the filling out. This second picture shows the dough rolled again to the 18 x 14-inch rectangle. No filling has seeped out.


Using your trusty ruler, mark out 1-inch sections and I use a pizza wheel cutter to cut the strips once it is marked. A very sharp knife will work as well.
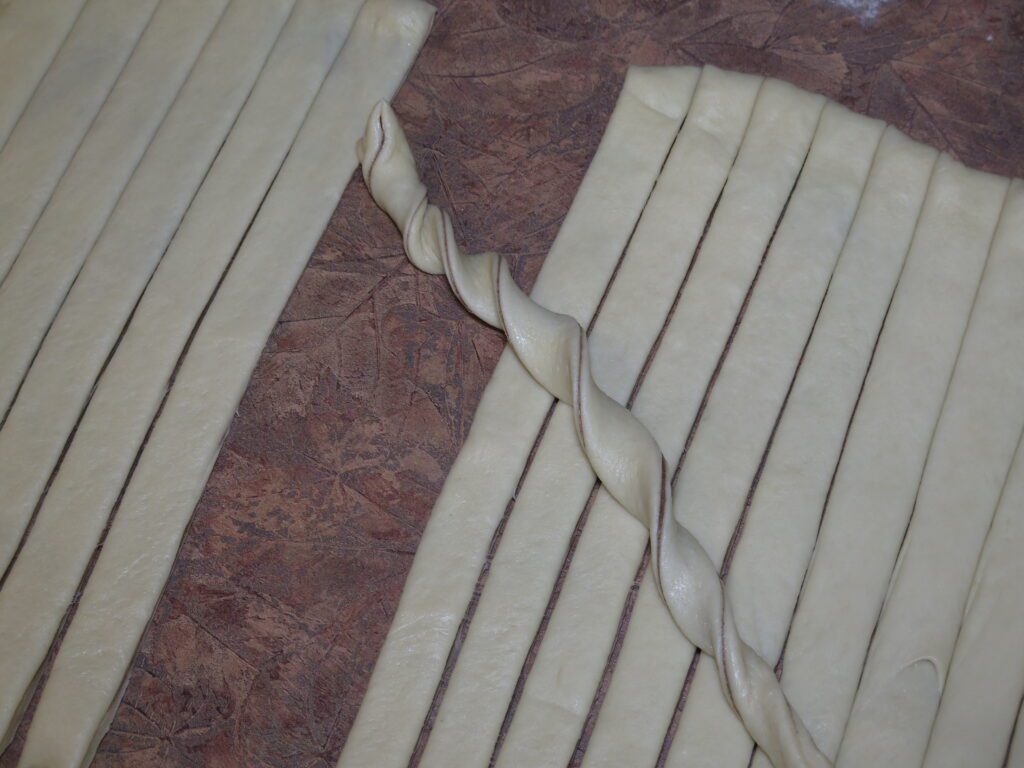
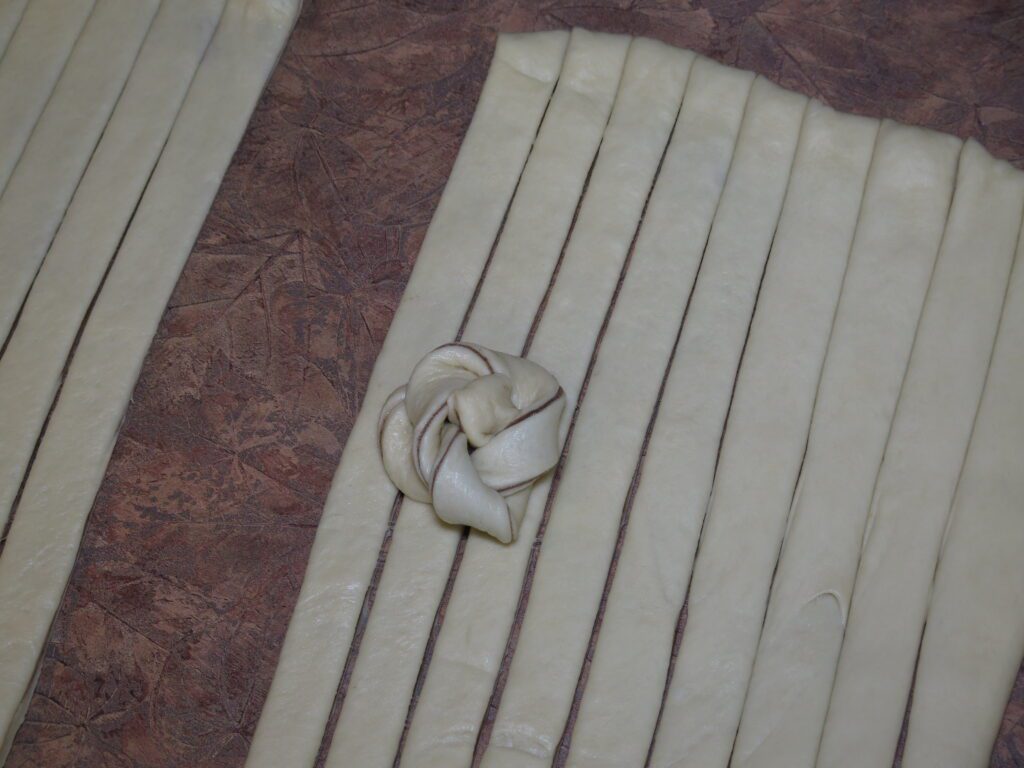
Take each 1-inch strip of dough and twist it lengthwise a few times. Then make a loose knot with the dough and tuck in the ends so they don’t poke out.


Place the buns into muffin tins. Gently brush each bun with the egg mixture and sprinkle with sugar. I don’t use a lot of sugar as I prefer these buns to not be very sweet. Feel free to add pearl sugar instead of Turbinado sugar if you want the sugar more pronounced after baking.


I bake both trays at the same time in my oven. After 5 minutes, I rotate the trays both side to side and turn them back to front. 5 more minutes, and these are done for me. The original recipe calls for a longer bake so please keep an eye on your baking. It may take 12 to 14 minutes for yours. You will have to check. You can always remove one and check the inside to make sure it’s baked through before you remove all the buns.
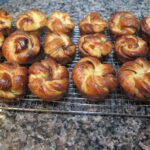
The Results of Swedish Cardamom Buns

These are well worth your time and effort. The taste is amazing! The dough is soft and has just the right amount of sweetness. I can’t recommend these enough.
They are the best on the day made but will store nicely in an air-tight container for a couple of days. Not that they will last that long 😉.